How To Design Using Photoshop And The Rule of Thirds
When you first open up Adobe Photoshop®, the sheer number of toolbars and options available is enough to make some people dizzy. Before you call up a freelance designer, click around a bit. Photoshop® might be an incredibly powerful piece of design software, but graphic design using Photoshop isn’t just for professionals. With a little bit of help and some time to yourself, you’ll be turning out beautiful graphics – with nary a professional graphic designer in sight. Let’s get started with an introduction to the core features of Adobe Photoshop®.
How to design using Photoshop: the basics
The most basic things Photoshop can be used for are resizing images and editing pictures. Resizing images is easy enough, but editing pictures could be a whole post in and of itself, depending on what you’re doing. We’ll focus on the basics: resizing and cropping and then straightening and setting values like hue and contrast.
How to resize an image using Photoshop
Image editing programs like Photoshop are excellent for enlarging or otherwise resizing images – after all, it was what they were built for. Learning how to resize an image using Photoshop® is pretty easy: to get started, all you need is a copy of Photoshop® or Photoshop® Express and an image file to work with. I’ll be walking through each step using the full-featured version of Photoshop®.
The image will shrink or expand depending on the width and height you’ve chosen. And that’s it – you’ve officially learned how to resize an image using Photoshop®. Now, we’ll move onto image editing basics, starting with cropping.
How to edit pictures using Photoshop: Cropping
Cropping is probably one of the most misunderstood tools in the Photoshop® toolkit, but it doesn’t have to be. Essentially, the point of cropping is to make changes to the photo beyond what a simple resize will do. Cropping a photo allows you to:
- Improve on the overall composition
- Focus on the main subject
- Zoom in on the subject
- Remove any distractions or unwanted elements
Cropping an image is a tool that too many people either don’t use or don’t know how to use: that said, let’s take a look into the underlying theory around why you crop an image, then work our way through the how.
Cropping: the rule of thirds
The basics of why you’d want to crop an image start with the rule of thirds, which is how photographers divide up a photo to determine focal points and ways to ease the viewer into the shot. The rule of thirds is an imaginary grid of nine squares divided into three sections. Where you place your subject within this grid can determine things as simple as the aspect ratio or as complex as the tension and visual impact of the shot.
So how do you crop photos in Photoshop®? First, you should create a rule of thirds grid of your own: Photoshop doesn’t come stock with one.
Cropping: creating a rule of thirds grid
Creating a rule of thirds grid is one of the best ways to ensure that you get a good experience when it comes to cropping your photos. Photoshop does come with its own grid function, but the grid squares are much too small to be effective for cropping. So let’s get started with creating a simple rule of thirds grid in Photoshop.
Now that you have your grid laid out, it’s time to initialize it. Click the “View” tab (third in from the right) and scroll down to the “Show” option. Another context menu will appear. Click on “Grid” and make sure that it has a check mark next to it. Now you’re ready to start cropping using your rule of thirds grid.
Let’s look at what we can crop out of the image I chose to use – in this case, a picture of a display for Hairspray! The Musical. Here’s the image with a rule of thirds grid applied, before we’ve done anything to it.
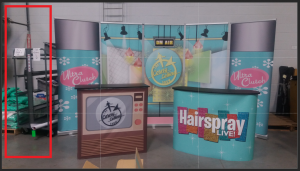
Almost immediately, you can see there’s space we can crop away off to the left.
But how do you actually crop? Look at the vertical menu bar along the left side: the cropping tool is the fifth one from the top. Once you click on it, it will frame the image in dotted lines with eight pull handles: three across the top, one on each middle side, and three along the bottom. Grab the one in the middle of the left side and pull it inward until it’s just barely touching the left side of the display: the part of the image to be cropped out will be greyed out. Hit “Enter” and Photoshop will crop it away.
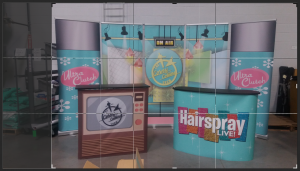
Once that gets cropped away, however, it gets a little tougher to determine what needs cropped. You can crop in from the right, but you need to be careful – otherwise you’ll end up cropping off part of the image itself. Likewise with the top – crop too far down and you risk cropping into your image.
With those two sections cropped out, however, there are fewer visible mistakes. The overall shot quality is much tighter, to boot.
Now that we have the image cropped, we can get it straightened out and then work on setting variables like hue and saturation.
To straighten an image, look for the Eyedropper tool (right under the Crop tool): right-click on it and scroll down to the Ruler tool (third from to the top). Once you have the ruler tool selected, it’s time to straighten your image. Pick two points on your image – it’s these two points that the ruler tool will use when it determines where to straighten the image from.
Once you’ve chosen the points, a line will appear between them, signifying the ruler. Now you can actually straighten the image: click “Straighten Layer” in the top center of the screen. This will rotate the image around the two points you described using the ruler tool.
With our image straightened out and cropped down, we can now set the values for hue and saturation. But what are hue and saturation?
Hue: A specific type of a color. This differs from straight colors because colors can have hues, but hues can’t have colors. For example, cyan is a hue of blue.
Saturation: The intensity of a hue. Levels of saturation range from no saturation (gray-tone) to high saturation (vivid color).
Here’s how you set the hue and saturation values for an image in Photoshop®:
The Hue slider changes the different colors that are present in the image: sliding it to the right makes things more blue, while sliding it to the left makes things more red.
The Saturation slider sets the intensity of the chosen color: sliding it to the right makes the color more vibrant, while sliding it to the left washes the color out and makes it greyer.
The Lightness slider lets you choose how dark or how light the image is: sliding to the left makes the image darker, while sliding to the right makes it lighter, all the way up to flat white.
Feel free to fiddle around with the sliders. Once you’ve settled on a hue/saturation/lightness combination that you like, hit Ctrl-S on your keyboard. This will save out your image as .psd (Photoshop® Document) file, allowing you to edit it in the future if you need to.
Looking for more in-depth Photoshop tutorials? Check out Adobe’s website for support and video lessons.
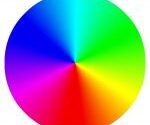
The Color Spectrum: RGB, CMYK and Pantones